顯示具有 Photoshop course Hong Kong 標籤的文章。 顯示所有文章

2012年12月7日 星期五

Photoshop Shortcut Commands & Shortcut Key Card Download


Simple-Photoshop-Shortcut-Commands
  • H (Hand Tool) — When zoomed in to a portion of your photo, this command brings up the hand tool which allows for quick panning. Also, if the hand tool is active and you hold down the Ctrl key, you can zoom in without changing to the zoom tool. Likewise, if you hold down the Alt key, you can zoom out without changing tools.
  • Z (Zoom Tool) — This command just brings up the zoom tool, which allows you to zoom in. Like with the hand tool, if you hold down the Alt key, it temporarily switches to the zoom out mode.
  • Ctrl + 0 (Fit on Screen) — This is a quick-and-dirty command to get the entire photo in front of your eyes. That’s Ctrl + zero, not the letter “O”.
  • B (Brush Tool) — The brush is an extremely useful tool when working with masks, and I’m constantly using this command along with the hand and zoom tools.
  • Ctrl + Z (Undo) — Very useful for the little mistakes we all make.
  • Tab (Hide/Show Palettes) — Hiding the palettes gives you a little more working room, thus decreasing your need to pan and zoom while editing.

Intermediate Photoshop Shortcut Commands
  • [ (Decrease Brush Size) -- Quickly decrease your brush size to get into those tighter spots.
  • ] (Increase Brush Size) — Quickly increase your brush size for the larger areas.
  • Shift + [ (Decrease Brush Softness) -- Decrease the softness of the brush by 25%.
  • Shift + ] (Increase Brush Softness) — Increase the softness of the brush by 25%.
  • 1->0 (Tool Opacity) — I usually run my brush opacity around 5% or 10%, but some things require a bit more opacity. Just press one of the numbers from 1 to 0 and your tool opacity will change from 10% up to 100%. If you want finer control, press a second number quickly after the first, and you can get any percentage you want. So pressing 4 will get you 40% opacity, while pressing 4 then 3 will give you 43% opacity.
  • Shift + 1->0 (Tool Flow) — This works exactly like the opacity changer, but you just have to hold the Shift key down while you hit the numbers.
  • Ctrl + Tab (Next Point on Curves Adjustment) — When using the curves adjustment dialog, you can place multiple points on the curve and adjust them accordingly. Sometimes you want to make very minor shifts in those points by nudging with the keyboard, but clicking on the point to activate it usually moves it to an undesired location. Use this command to switch focus from point to point without moving them around.
Advanced-Photoshop-Shortcut-Commands

  • Ctrl + Shift + N (New Layer) — This will bring up the new layer dialog box and place a new layer on top of the active layer.
  • Ctrl + Alt + Shift + N (New Layer No Dialog) — This command skips the dialog box and just places a new layer on top of the active layer.
  • Ctrl + Shift + C (Copy Merged) — This works basically like the copy command, except you get a merged copy of the composite image sent to the clipboard. This command only works if you’ve made a selection on the image first (use Ctrl+A to select all), otherwise you’ll get a copy of nothing. This is useful if you want to duplicate what you see on the screen into another image file or even another layer.
  • Ctrl + Alt + Shift + E (Stamp Visible) — This is actually one of my favorite commands. First, I’ll create a new empty layer on top of the stack. Then I’ll select that new layer and use this command. It does basically the same thing as the copy merged command, except it places the copy right into the new layer. I use this for creating layer blends, sharpening, and any other type of editing that can’t be done non-destructively.
  • Ctrl + Alt + Shift + K (Show Keyboard Commands) — If you forget any of these commands, or if you want to check on other commands, use this to bring up the help dialog on keyboard shortcuts.
Photoshop Course in Hong Kong

2012年12月6日 星期四

Playing with 3D in Photoshop CS6

Photoshop CS6 has updated its 3D tool adding more features and making it easier to use and faster. We decided to play with some 3D using Photoshop to create a basic extrusion and then adding some old halftone style to it.

So in this tutorial we will create a basic 3D effect using Photoshop and Illustrator. The whole process is very simple but it might take you up to 2 hours to go through the whole technique.

Step 1

Open Illustrator and create a new document. Using the font Teutonic No1 DemiBold, you can download it here (http://www.fontsquirrel.com/fonts/Teutonic-No1), create your text. I added the text 3D in CS6. Notice that I connect the letters so there pretty much one big block.
Playing with 3D in Photoshop CS6

Step 2

Copy the text in Illustrator and then go to Photoshop. Paste the text there.
Playing with 3D in Photoshop CS6

Step 3

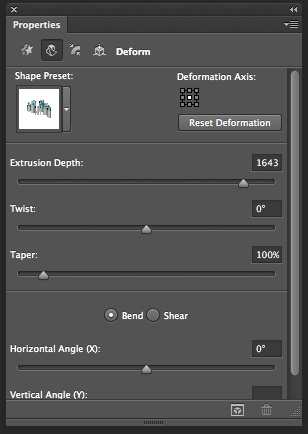
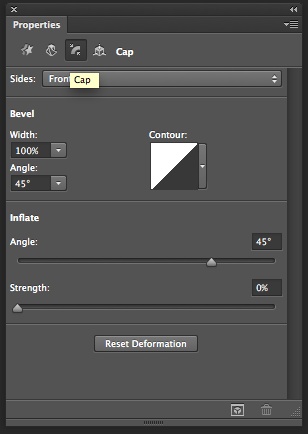
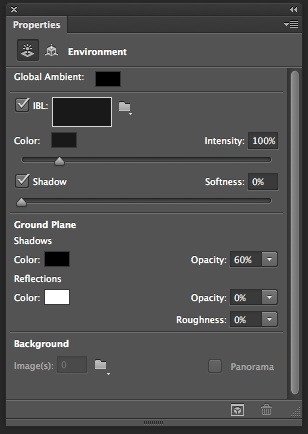
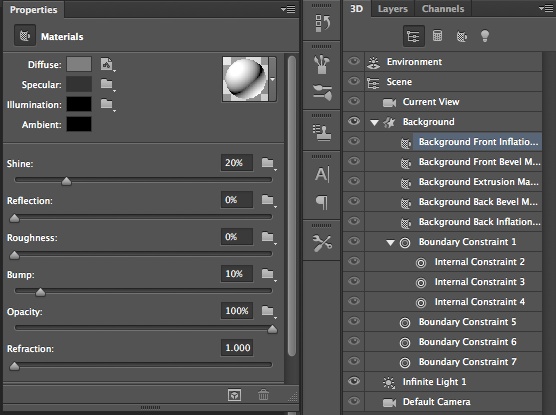
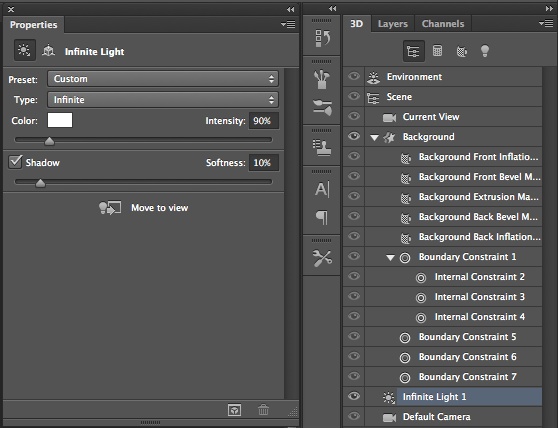
Time to add some 3D. With the new layer selected go to 3D>New 3D Extrusion from the Selected Layer. After go to Window>3D so you can see the 3D panel. Follow the images below for the 3D properties for the Scene, Object, Texture and Lighting.
Playing with 3D in Photoshop CS6

Step 4

Here is the 3D text you will have after applying the effects. Now it's time to render. Go to 3D>Render.
Playing with 3D in Photoshop CS6

Step 5

The 3D image will be render and you will get a much sharper result. The rendering might take a little long, so it's time to get some coffee :) Once is done duplicate this layer. We will use it in the future to create a mask.
Playing with 3D in Photoshop CS6

Step 6

Once the render is over you can rasterize the layer. After that go to Image>Mode>Greyscale. Then go again to Image>Mode>Bitmap. Select 300 Pixels/Inch for the output and Halftone Screen for the Method.
Playing with 3D in Photoshop CS6

Step 7

For the Halftone Screen properties use 30 for the Frequency, 45 for the Angle and LIne for the Shape.
Playing with 3D in Photoshop CS6

Step 8

This is the result of the Halftone. Go again to Image>Mode>RGB Color. Using the layer duplicated in the Step 5, create a marquee selection by holding Command and clicking on the thumb of the layer. The idea here is to hide the background with the halftone. We just need the 3D text and shadow.
Playing with 3D in Photoshop CS6

Step 9

Add a new layer and fill it with #303030 for the color.
Playing with 3D in Photoshop CS6

Step 10

Move the new layer so it's behind the 3D. Select the 3D layer and change the Blend Mode to Multiply.
Playing with 3D in Photoshop CS6

Step 11

Duplicate the layer and change the Blend Mode to Normal.
Playing with 3D in Photoshop CS6

Step 12

Go to Layer>New Adjustment Layer>Photo Filter. Use Deep Blue for the Filter at 50%.
Playing with 3D in Photoshop CS6

Step 13

Select all layers and duplicate them. After that merge the new layers into one and go to Filter>Blur>Gaussian Blur. Use 10 pixels for the Radius.
Playing with 3D in Photoshop CS6

Conclusion

Change the Blend Mode of the blurry layer to Overlay at 50% and the design will be done. The idea of this tutorial was to create a nice 3D effect using the new 3D interface in Photoshop CS6 and we found out that it has improved quite a lot since the previous version in terms of speed and ease to use.

2012年12月3日 星期一

Photoshop 的新功能?

Adobe® Photoshop® CS6 軟體提供最新的影像功能,全新的創意選項和快如閃電的效能。使用全新的內容感應功能來潤飾影像,並運用全新和改良的工具與工作流程製作出色的設計與影片。

升級至 Photoshop CS6,享受前所未有的速度、功能與生產力。嶄新優雅的介面,為您呈現多種創新設計工具 — 包括「內容感知」修補功能、全新的「模糊收藏館」、更快速精確的「裁切」工具、直覺的視訊建立工具及更多其他功能。
那裡可以學Photoshop?
設計行業總帶有一種迷人的魅力。不論是專業設計師天馬行空的創作,還是網絡上供分享的業餘作品,設計工作都令人嚮往。 Adobe Photoshop及 Illustrator是數碼設計行內的一雙王牌軟件,具有跨軟件融合運用的特性,能大大提升設計工作的效能,使設計創作人員可以投放更多時間於創意發 展。 本課程提供完整訓練,深入講解將Photoshop和Illustrator應用於平面設計的種種技巧,讓學員在設計理論以外掌握專業實用技術,利用軟件 的 多樣化與整合功能發揮最大創意,製作出適用於印刷或互聯網的專業作品。畢業學員更可選擇報考Adobe Certified Expert專業認證,獲取國際認可專業資格。

香港Photoshop Illustrator 課程